Shoulder pain is the pain that can wreak havoc on your life, yet many people resign themselves to simply having bad shoulders not realizing that they fully have the capability to do something about it. Shoulder pain can drastically reduce your ability to lift heavy weight, as well as perform daily activities. Let’s stop for a minute and fantasize about your shoulders moving freely and rhythmically throughout a full range of motion. Yeah… that was a good fantasy right? Fortunately, there are plenty of ways to make this fantasy a reality. Make some changes and follow our simple 5 step process to addressing your shoulder problems so that you can finally improve your quality of life and achieve the goals in your life.
Step 1: Fix Your Training Program
First things first: if you are exercising without a balanced, calculated program you are going to have problems. If you are someone who solely focuses on pumping up your pecs and only work the muscles you can see in the mirror, then it should come as no surprise to you that your shoulders are constantly hurting. Even if you have the nicely muscled arms you’ve always worked towards, chances are you are still not hitting the right pulling movements for optimal shoulder health. Don’t believe me? Try a simple shoulder mobility test real quick. While standing with a neutral spine, can you lift both arms so that your biceps are even with your ears?
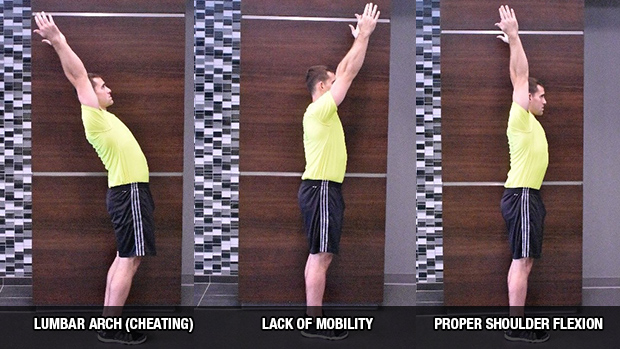
If you looked similar to the first picture when performing this test then congratulations, you are a cheater! The first picture demonstrates a lumbar compensation, which means your pecs are tight, and your back is weaker in comparison so you compensate by leaning back. If you need to lean back like this to hit a standing press you will have some serious lower back issues down the road to compliment your shoulder problems.
If you look more like the second picture and your biceps are not in line with your ears then you do not possess adequate shoulder flexion. You need to add more upper body pulling exercises (as well as do some soft tissue work and stretch which is addressed later.)
If you resemble the third picture and your biceps are next to your ears and your ribs are pulled down, then congratulations! You hit the Goldilocks zone and you are “just right.” Still read on though because there is much more to know when it comes to building stable, functional shoulders.
Not convinced that you need to correct your programming yet? Ok, try one more test. Think about how your posture is throughout the day. Are your shoulders lurched forward and do you have a forward neck position. Not sure? Look in a mirror and see how you are sitting or standing right now. Odds are you are looking like the hunch back if you are being honest with yourself. Your posture says a lot about your current program.
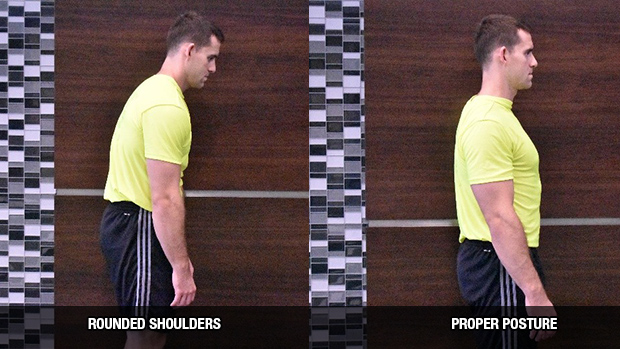
Ok, so now that we have addressed the fact that you need to make a change to your program, we need to look at some things you can do to make poor posture a thing of the past. An ideal ratio to shoot for is 3 pulling exercises for every 2 pushing exercises. Why this ratio? Well… follow our logic here… more pulling exercises is what will improve your posture by pulling your shoulders back, which will help you lift more as well. It’s a win-win!
Make sure you include some pulling exercises every time you lift. This can be as simple as doing band pull aparts on your pressing days between sets to make sure the shoulders stay in good alignment when you press. In fact, it would be a great idea to always carry a resistance band with you everywhere you go in the gym. Someone on the machine you were planning on using? Do some pull aparts while your waiting. About to hit your next bench set? Do some band pull aparts before to help your back stay active throughout the lift. Moral of the story: do band pull aparts.
Be sure you include plenty of vertical and horizontal pulling to address the entire back. Use a narrow grip when you hit your horizontal rows for your inner back, and a wide grip when you are trying to work your outer back. Do both chin-ups and pull-ups so that your shoulder stays mobile. Use both wide and narrow grips on your lat pull downs. Just be sure you don’t do lat pull downs behind the neck. This is a common mistake that will just increase shoulder pain and cause more damage.
Step 2: Fix Your Pressing Technique
Now that we’ve established that your programming is not hitting key exercises needed to stabilize the shoulders and reduce pain, allow us to convince you even further by telling you that your technique is probably hurting you just as much…
About the Author
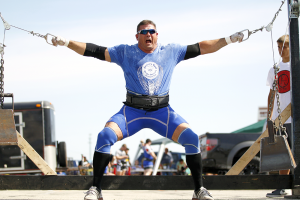 Chad Coy has been a part of the Parisi Speed School family since signing as the 13th Franchise in 2006. A graduate of Purdue University in 1991, Chad studied Exercise Science and Nutrition. Chad still has a strong commitment to as an athlete, and has competed as a professional strongman since 1998. He has won Masters’ America’s Strongest Man two times and placed second at Masters’ Worlds two times after 10 years as an open Pro.
A Powerlifter from 1994 -1998, he has also won 2 National Powerlifting Championships, 1 World Championship, and holds 4 American Records and 3 World Records. Chad joined the Master Trainer program in the winter of 2014 and takes great pride in helping educate the future coaches of the franchise.

 March Athlete Of The Month